
Online Controller Tester | How to Fix Stick Drift (PS5 & Xbox)
Use our live controller tester to detect stick drift and button lag.
A complete guide to repairing PS5 and Xbox controllers with Hall Effect and cleaning
CONTROLLER TESTER
Connect a gamepad and press any button to begin
LEFT STICK
RIGHT STICK
TRIGGERS & BUMPERS
FACE BUTTONS
DRIFT ANALYSIS
Adjust sensitivity for drift detection
CONTROLLER INFO
HAPTIC FEEDBACK TEST
Test vibration motors (Xbox, PS4, PS5)
BUTTON RESPONSE TIME TEST
Test your reaction time and button responsiveness. Press the A/X button when the indicator turns green!
DEAD ZONE & PRECISION TEST
Test analog stick precision and detect dead zones. Slowly rotate each stick in a full circle.
INPUT LOG
The Changing Journey of Technology
From the beginning of the twentieth century until today, technology has passed through many eras. There was a time when people found joy in wooden toys and outdoor games, and today the same generation has shifted to PS5 games. Those were the days when the biggest problem in life was school homework, and the greatest happiness was playing video games on a Sunday afternoon.
Our generation has witnessed technological change very closely, and even today, those childhood memories remain close to our hearts. The days when NES, SEGA, or PlayStation felt like magic to us.

From Old Controllers to Modern DualSense
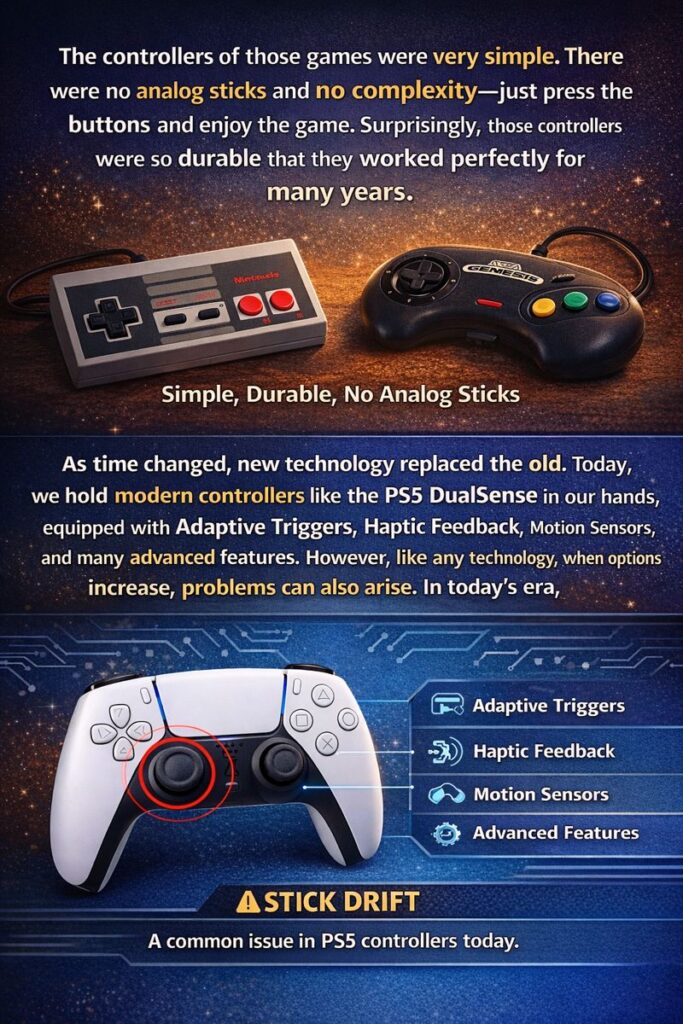
The controllers of those games were very simple.
There were no analog sticks and no complexity—just press the buttons and enjoy the game.
Surprisingly, those controllers were so durable that they worked perfectly for many years.
As time changed, new technology replaced the old. Today, we hold modern controllers like the PS5 DualSense in our hands, equipped with Adaptive Triggers, Haptic Feedback, Motion Sensors, and many advanced features. However, like any technology, when options increase, problems can also arise.
In today’s era, the most common issue in PS5 controllers is stick drift.
What Is Stick Drift?
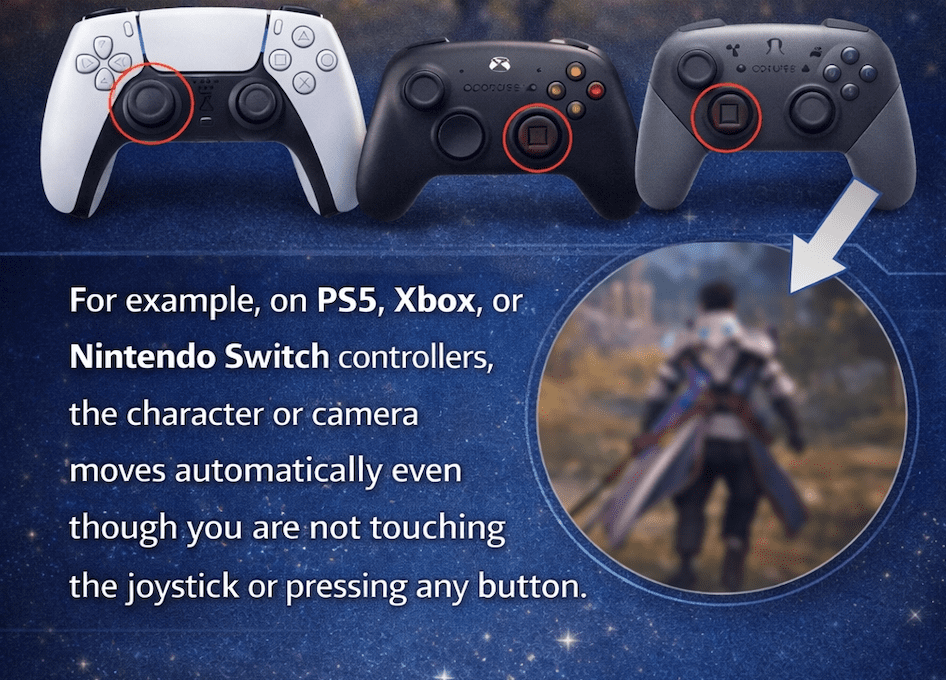
Stick drift is a frustrating problem in the gaming world where your in-game character starts moving on its own. For example, on PS5, Xbox.
or Nintendo Switch controllers, the character or camera moves automatically even though you are not touching the joystick or pressing any button.

How Does It Feel?
Imagine you are playing a shooting game and you take your hands off the controller, yet your character slowly starts moving to the left, or the camera begins rotating upward on its own.
When a specific sensor or stick inside the controller starts sending signals automatically, this is known as stick drift.
Why Does Stick Drift Happen?
There are several basic scientific and mechanical reasons behind Stick Drift:
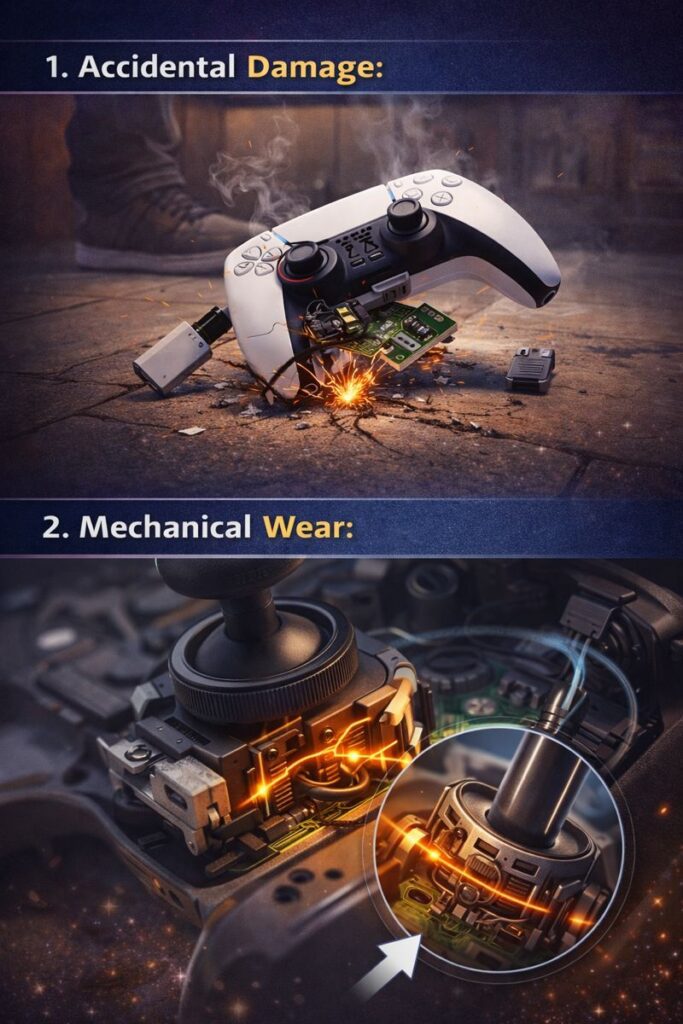
Accidents: Dropping the controller or any physical impact. It is often observed that a physical shock causes small internal components to shift out of place.
Mechanical Wear: Over time, controllers wear down. Inside are small components called Potentiometers.
Repeatedly moving the stick wears down the internal metal strips, causing them to send “ghost” signals.
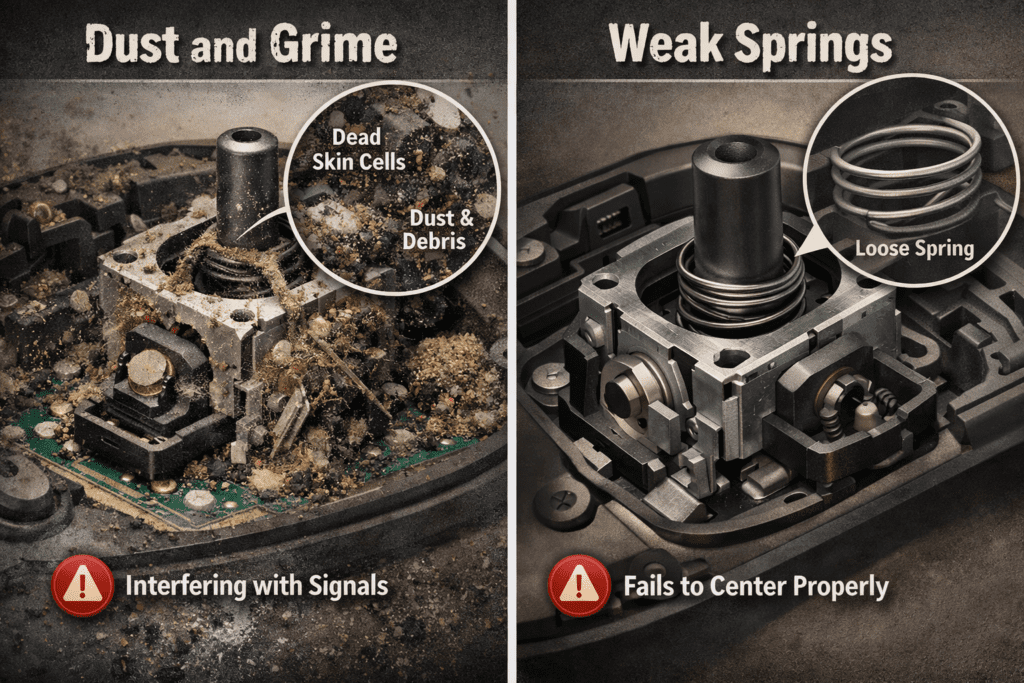
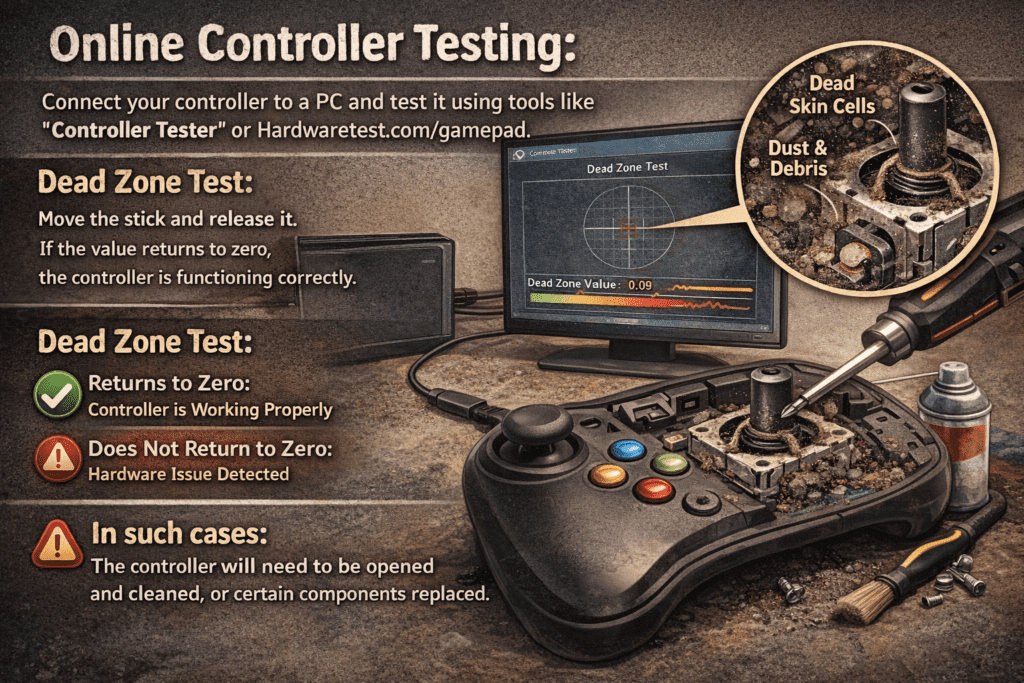
Dust and Grime: Dead skin cells from our hands, dust, and debris often find their way into the sensors. This buildup interferes with performance and prevents the controller from sending accurate signals.
Weak Springs: The internal springs lose their tension over time. If they become loose, the stick fails to return to the exact center, triggering movement.
In short:
Stick drift is usually the result of worn internal parts or dust buildup. If the problem is in its early stages, cleaning or a software reset can fix it.
Severe Stick Drift and Advanced Solutions
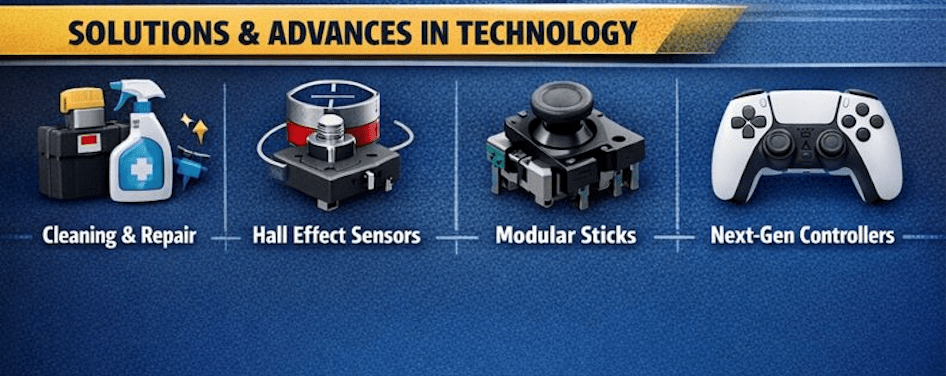
However, in cases of severe and persistent drift, replacing components or adopting modern technology like Hall Effect sensors becomes the best solution.
Diagnosis and Tool-Free Solutions
Diagnosis and Tool-Free Solutions
Before opening the controller, it is important to determine whether the issue is software-related or hardware-related.
Online Controller Testing:
Connect your controller to a PC and test it using tools like “Controller Tester” or Hardwaretest.com/gamepad.
Dead Zone Test:
Move the stick and release it. If the value returns to zero, the controller is functioning correctly. If the value does not return to zero or continues to fluctuate, it indicates a hardware issue.
In such cases, the controller will need to be opened and cleaned, or certain components replaced.
Software Update
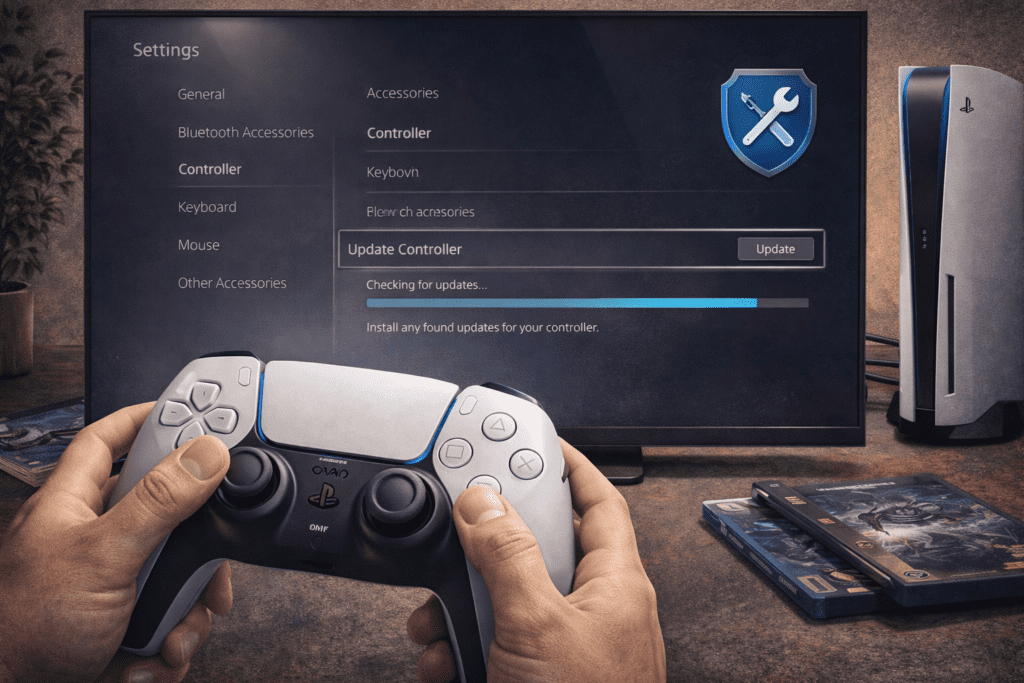
Always keep your controller updated. Sony often releases firmware updates that automatically recalibrate stick balance, fixing minor drift issues. These updates reset analog stick sensitivity and resolve ghost inputs or drift-related problems.
If you are using a PS5, go to:
Settings > Accessories > Controller
Check for available updates and install them if available.
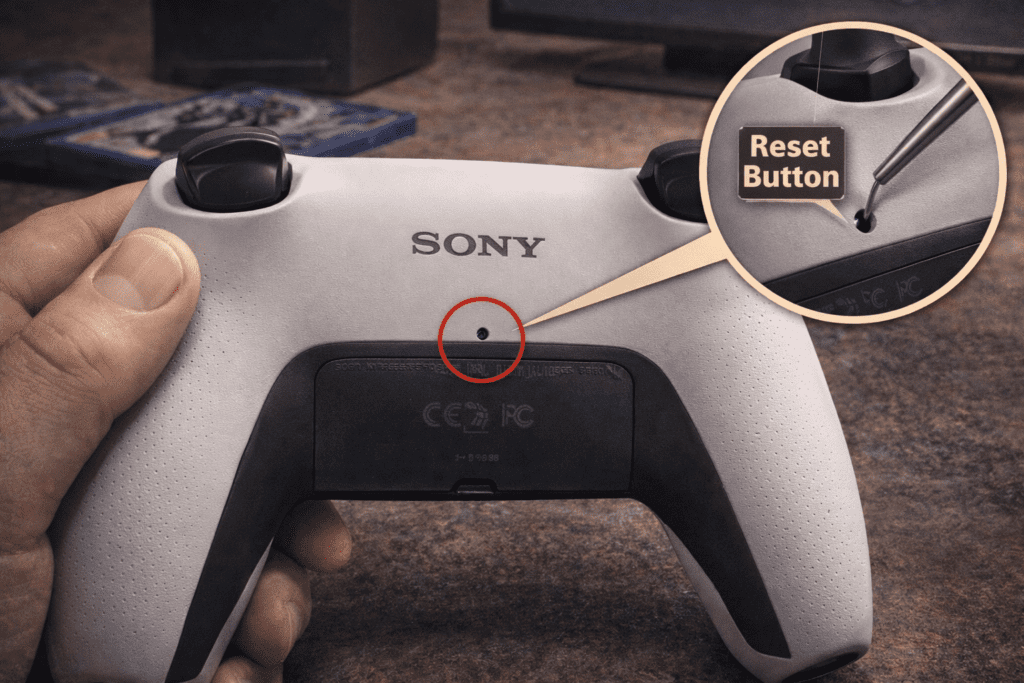
Hardware Reset
This method restores the controller to factory settings. On the back of the PS5 controller, near the Sony logo, you will find a small hole.
While the controller is powered on, use a thin pin to press and hold the reset button inside the hole for 5 seconds.
This resets all settings, clears temporary memory, and reconfigures firmware, often resolving software-related drift issues.
Compressed Air (Air Pressure Cleaning)
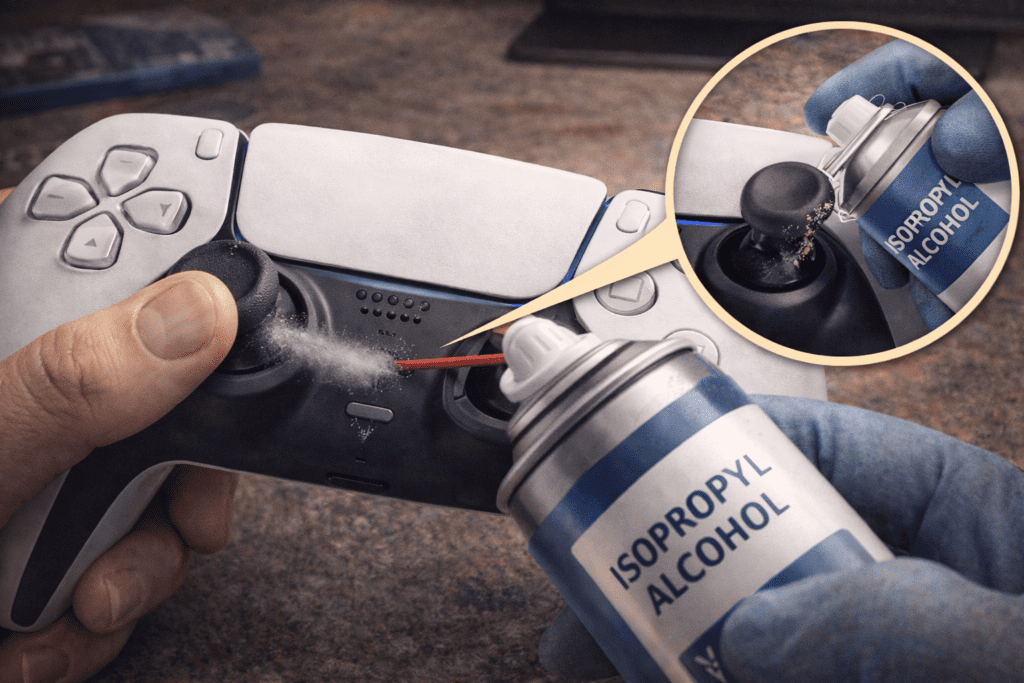
If dust is the cause of drift, tilt the analog stick to one side and spray compressed air or Isopropyl Alcohol inside.
Then rotate the stick for about 30 seconds to remove debris. This often resolves stick drift and restores proper performance.
L3 and R3 Buttons — A Major Cause of Drift
The L3 and R3 buttons (pressing the analog sticks inward) are the most frequently used yet most fragile buttons.
Many games assign actions like sprinting or melee attacks to these buttons, which significantly contributes to stick drift.
To extend your controller’s lifespan and protect it from drift, follow these three methods:
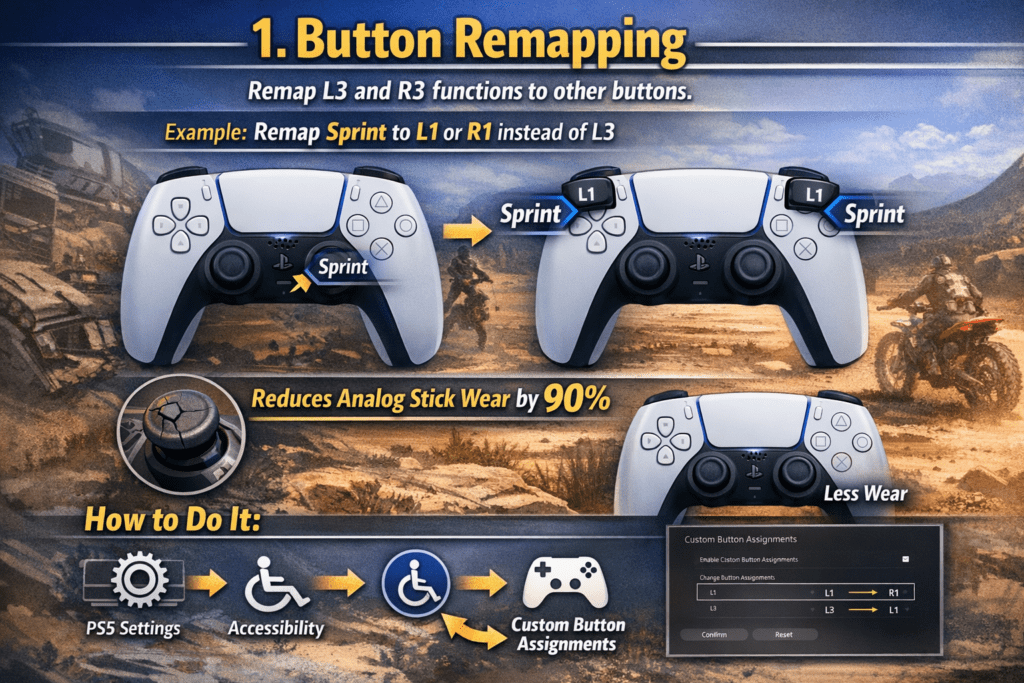
1. Button Remapping
This is the most effective method. You can remap L3 and R3 functions to other buttons in game settings.
Example:
Assign sprinting to L1 or R1 instead of L3. This reduces pressure on the analog stick sensors by nearly 90%.
How to do it:
Go to
PS5 Settings > Accessibility > Controllers > Custom Button Assignments and change the button layout.
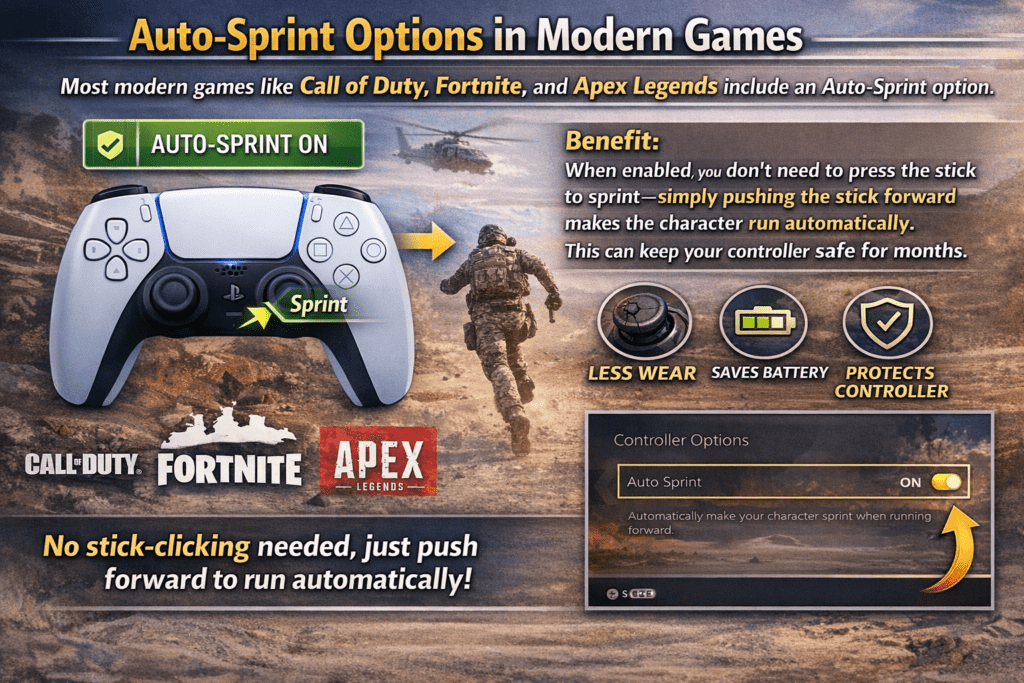
2. Use the Auto-Sprint Feature
Most modern games like Call of Duty, Fortnite, and Apex Legends include an Auto-Sprint option.
Benefit:
When enabled, you don’t need to press the stick to sprint—simply pushing the stick forward makes the character run automatically. This can keep your controller safe for months.
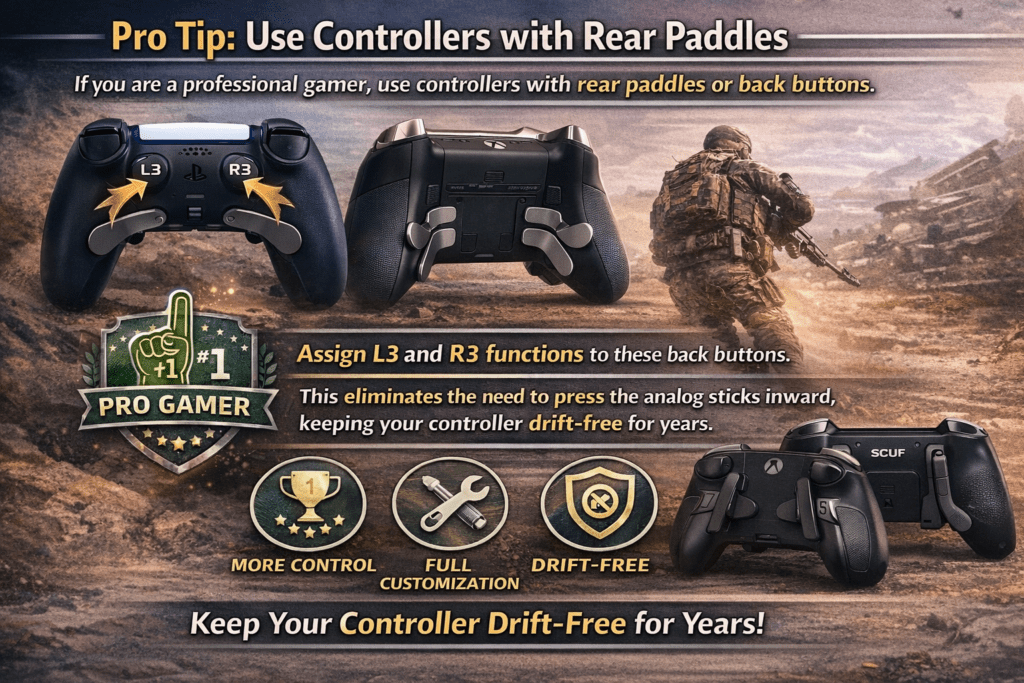
3. Back Button Attachments or Edge Controllers
If you are a professional gamer, use controllers with rear paddles or back buttons.
Assign L3 and R3 functions to these back buttons. This eliminates the need to press the analog sticks inward, keeping your controller drift-free for years.
Controller Disassembly and Cleaning (Step-by-Step Guide)
If software resets do not solve the issue, you can clean the internal components using the following steps:
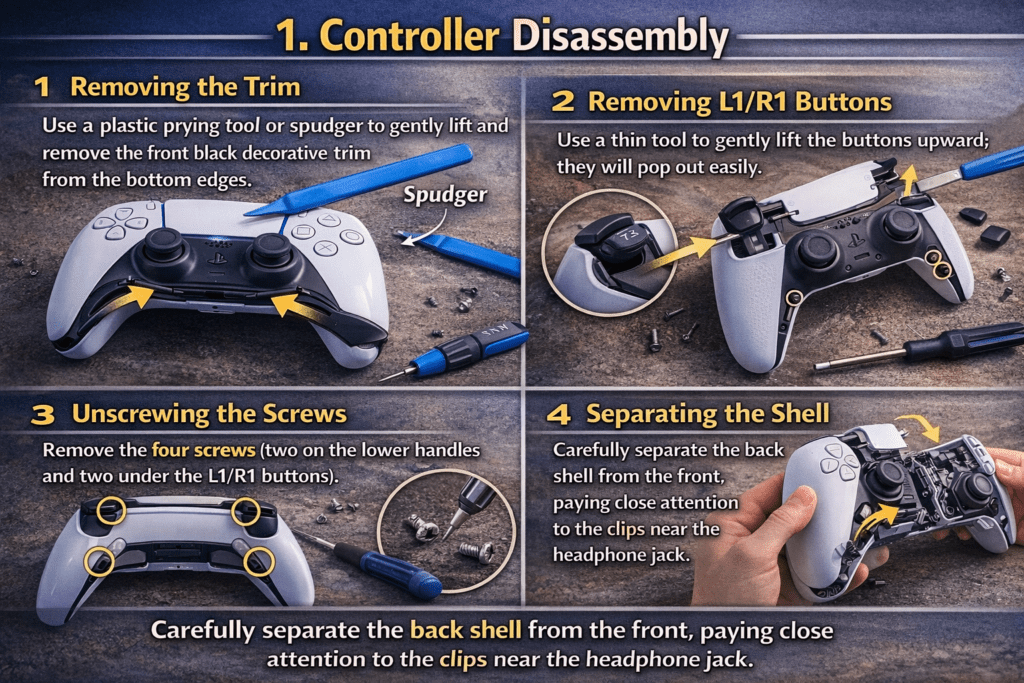
1. Controller Disassembly
Removing the Trim:
Use a plastic prying tool or spudger to gently lift and remove the front black decorative trim from the bottom edges.Removing L1/R1 Buttons:
Use a thin tool to gently lift the buttons upward; they will pop out easily.Unscrewing the Screws:
Remove the four screws (two on the lower handles and two under the L1/R1 buttons).Separating the Shell:
Carefully separate the back shell from the front, paying close attention to the clips near the headphone jack.
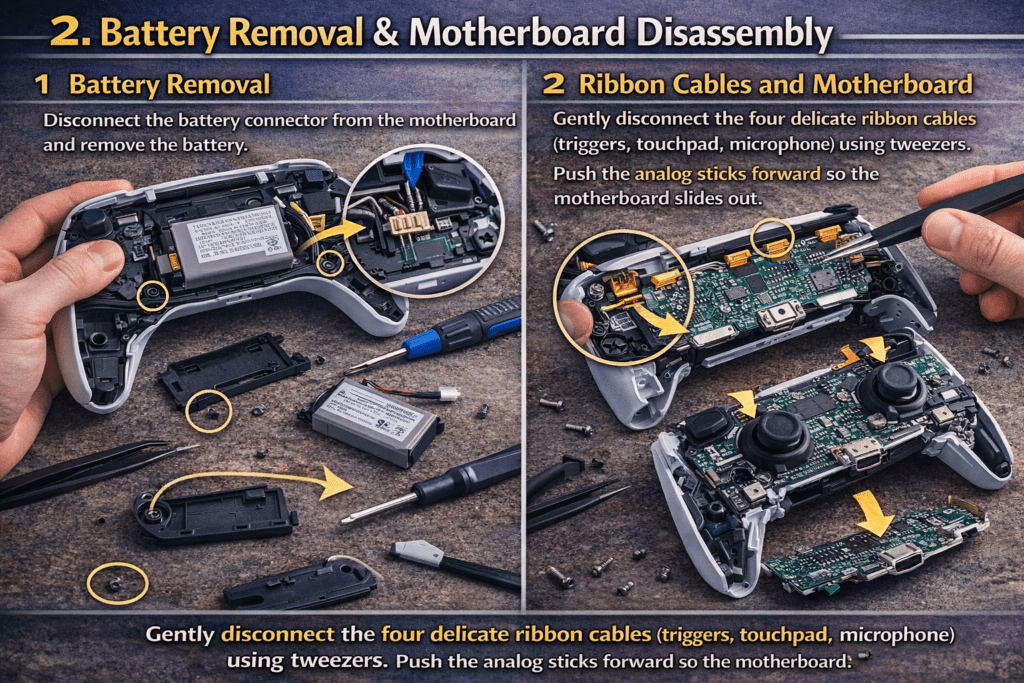
2. Cleaning Internal Components
Battery Removal:
Disconnect the battery connector from the motherboard and remove the battery. Unscrew and remove the plastic tray beneath it.
Ribbon Cables and Motherboard:
Gently disconnect the four delicate ribbon cables (triggers, touchpad, microphone) using tweezers. Push the analog sticks forward so the motherboard slides out.
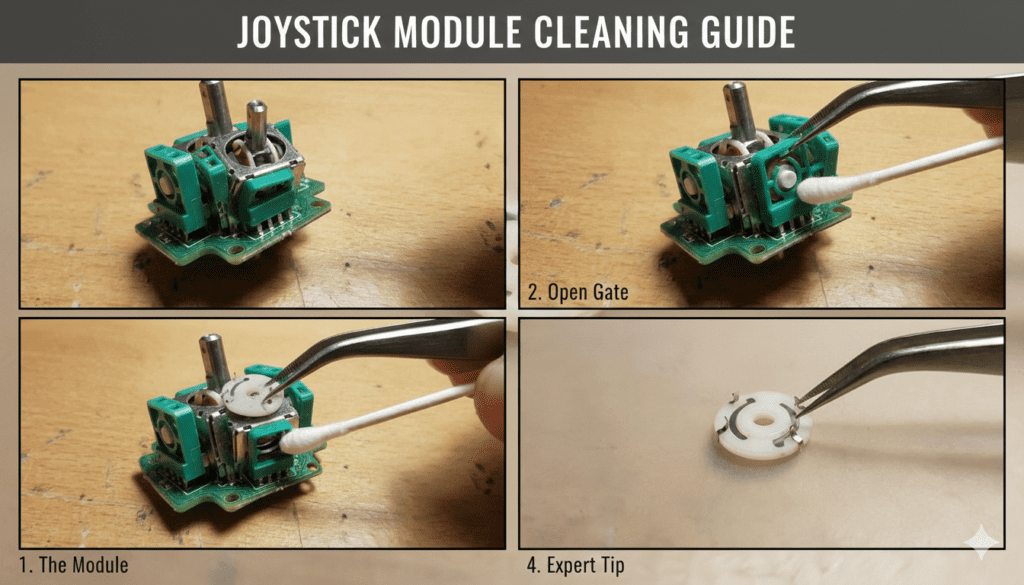
3. Potentiometer Cleaning
You will see two small green plastic gates on the sides of the joystick module.
Opening the Sensor Gate:
Use a thin pin or tweezers to bend the top of the green gate backward at a 45-degree angle. Do not apply excessive force.
Removing the Wiper Disc:
Inside, there will be a small white disc. Remove it carefully.
Chemical Cleaning:
Clean the white disc and the black carbon track inside the gate using 90% Isopropyl Alcohol and a cotton swab.
Expert Tip:
If the tiny metal legs on the white disc are flattened, gently bend them upward so they make firm contact with the carbon track.
Permanent Solution — Hall Effect Technology
While cleaning can temporarily fix stick drift, traditional sensors rely on friction, making future drift inevitable. The only permanent solution is installing Hall Effect sensors.
Why Is Hall Effect Technology Superior?
Traditional potentiometers use metal brushes that rub against carbon tracks, which wear down over time. In contrast, Hall Effect sensors detect movement through magnetic fields.
Since there is no physical contact or friction, their lifespan is virtually unlimited, and they never develop drift.
Comparison Table: Traditional Potentiometer vs Hall Effect Analog Sticks
| Feature | Traditional Potentiometer Sticks | Hall Effect Sticks |
|---|---|---|
| Working Principle | Physical contact between metal brushes and carbon tracks | Magnetic field detection (no physical contact) |
| Friction | Yes (constant friction) | No friction |
| Wear Over Time | High — components wear down with use | Almost none |
| Stick Drift Risk | Very high over time | Practically zero |
| Lifespan | Limited (months to a few years depending on usage) | Extremely long (theoretically lifetime) |
| Maintenance | Requires regular cleaning | No cleaning required |
| Accuracy | Decreases over time | Remains consistent |
| Cost | Cheaper initially | Slightly expensive but long-term value |
| Best For | Casual gamers or short-term use | Professional and long-term gamers |
Frequently Asked Questions (FAQs)
1. Is stick drift a manufacturing defect?
Not always. In most cases, stick drift occurs due to mechanical wear, dust buildup, or heavy usage. However, in rare cases, factory defects can cause early drift.
2. Can stick drift fix itself?
No. Stick drift does not fix itself. Temporary improvement may occur after cleaning or resetting, but without maintenance or part replacement, the issue usually returns.
3. Does updating the PS5 controller firmware really help?
Yes. Firmware updates can recalibrate analog stick sensitivity and remove minor ghost inputs. However, firmware updates cannot fix physical wear or damaged components.
4. How long does a DualSense controller usually last before drift appears?
With heavy gaming (especially using L3/R3 frequently), drift can appear within 6–12 months. Moderate users may experience drift after 1–2 years.
5. Is cleaning the analog stick safe?
Yes, if done carefully. Using compressed air or 90% Isopropyl Alcohol is safe. Avoid water, excessive liquid, or aggressive force.
6. Are Hall Effect sticks worth the cost?
Absolutely. While the upfront cost is higher, Hall Effect sticks eliminate friction-based wear and provide a permanent solution to stick drift.
7. Will opening the controller void the warranty?
Yes. Opening the controller usually voids the manufacturer’s warranty. If your controller is still under warranty, it’s best to claim a replacement first.
8. Can button remapping really reduce stick drift?
Yes. Reducing the use of L3/R3 significantly lowers internal pressure on analog stick sensors, which can reduce wear by up to 90%.
9. Do all games support Auto-Sprint?
Most modern FPS and action games do, but not all. Always check the in-game control settings.
10. Should casual gamers upgrade to Hall Effect sticks?
Casual gamers can rely on cleaning, remapping, and firmware updates. Hall Effect upgrades are ideal for competitive or long-term gamers.
11. Is stick drift more common in PS5 than older consoles?
Yes. Modern controllers use compact, high-precision components, which are more sensitive to wear compared to older, simpler designs.
12. What is the safest long-term strategy to avoid stick drift?
Use button remapping, enable Auto-Sprint, keep the controller clean, update firmware regularly, and avoid pressing analog sticks inward forcefully.
About the Author
Name: Adeel Farooq
Pakistan
adeelsco2@gmail.com

The author is a technology enthusiast and gaming hardware specialist with a deep interest in console controllers, repair techniques, and emerging input technologies. With years of hands-on experience using, testing, and repairing PlayStation, Xbox, and PC gaming controllers, the author closely follows the evolution of analog stick technology—from traditional potentiometers to modern Hall Effect sensors.
Having grown up during the era of NES, SEGA, and early PlayStation consoles, the author brings both technical understanding and nostalgic insight into modern gaming hardware issues. Their writing focuses on practical solutions, long-term reliability, and educating gamers on how to extend the lifespan of their equipment through smarter usage, maintenance, and upgrades.
Through detailed guides and easy-to-understand explanations, the author aims to bridge the gap between everyday gamers and advanced hardware knowledge, empowering readers to make informed decisions about controller care and repairs.